The Case of Endless Duplicate Contacts in GALSync

Tags

, , , ,

The synchronisation issues in GALSync can sometimes be relatively easy as deleting a conflicting object on the target Active Directory or as complicated as pulling your hair for many days trying to decode the error messages to find the root cause. One of these cases is when the Contact objects start to duplicate endlessly in multiple domains. The reasons for such duplications can vary. I will focus on one of those that I came across recently as I was pulling my hair thinking how to fix it for a while.

A few days ago, we received a ticket from a user stating that NDRs are being sent for one of the users when emails are sent to him. The NDR led to us discovering that the recipient had multiple Contact objects making Exchange to fail email delivery. As soon as we saw that, we went ahead with the simple solution of deleting the duplicate contacts to resolve the situation. After an hour, we started to see the duplicates being created again, one per hour, bu only for a Room Mailbox. As soon as we saw that, I immediately jumped into GALSync to investigate this and resolve it with almost no prior experience with it – so you can imagine how that went! While I had worked with FIM and MIM before, I had never seen a MIM with that many errors as it was in this case.

In the Synchronization Service Manager console, the error recorded for this object was “ma-extension-error” with no further information. I compared the duplicates and noticed that all common attributes such as the Proxy Addresses of the objects were identical to each other. Then, I started researching online about the error message and reading through whatever related to this issue that I could get hands on. Thinking that this may be due to some issue with the object in the metaverse, I deleted all the corresponding contacts in all the provisioned domains, and disconnected all the connectors of the object, which eventually removed it from the metaverse. An important thing to note is that when you want to remove an object from the metaverse in this manner temporarily and disconnect a (projection) connector, you should select “Disconnector (default)” as the Disconnector State. In the next sync cycle, MIM created the object in the metaverse again and restored the connectors. But, the problem remained. Yet, for some reason, MIM changed the connectors of the object to the latest contacts it created, ignored the existing ones, and continued to do the same.

I checked the event log and found the following detailed error that did not make sense at all.

Event ID: 0 (or 6500)
Source: FIMSynchronizationService
Log Name: Application

The description for Event ID 0 from source FIMSynchronizationService cannot be found. Either the component that raises this event is not installed on your local computer or the installation is corrupted. You can install or repair the component on the local computer.

If the event originated on another computer, the display information had to be saved with the event.

The following information was included with the event:

There is an error in Exch2010Extension AfterExportEntryToCd() function when exporting an object with DN CN=ConferenceRoom(2), OU=Contacts, DC=contoso, DC=com.

Type: Microsoft.MetadirectoryServices.ExtensionException

**** ERROR ****

The property value you specified, “-1073740026”, isn’t defined in the Enum type “Nullable`1”.

**** END ERROR ****

Stack Trace: at Exch2010Extension.Exch2010ExtensionClass.AfterExportEntryToCd(Byte[] origAnchor, String origDN, String origDeltaEntryXml, Byte[] newAnchor, String newDN, String failedDeltaEntryXml, String errorMessage)

the message resource is present but the message is not found in the string/message table

So, I went back and did the same object deletions a couple more times with forced replications in the domains to see if that made any difference since MIM was configured to use any preferred domain controllers. Finally, since that did not work, I went back to the event log, and this time, I copied parts of the event and started to search. Surprisingly, the specific part of the error, which did not make much sense, matched with this TechNet Wiki article.

Voila, it stated the reason exactly – the Room Mailbox’s user account was enabled for some reason. I disabled it and let GALSync run for a few more rounds and the issue was finally fixed.

The solution was pretty simple but getting to it was not very simple. I hope this helps you in case you come across the same issue.

Moving to Vietnam for Work

Tags

,

While short visits to Vietnam are relatively easy, moving here for the long haul can be quite challenging. Recently I got the exciting opportunity of moving to Vietnam for work and the steps I had to follow as a Sri Lankan living in Sri Lanka were confusing and challenging due to unclear processes and documentation. With some difficulty, I managed to jump through the hoops and finish what I started. Just because I had to go through a difficult time does not mean that you should have to do the same, so I thought of writing this guide to help you if you have a dream to come here.

The basic document you need to come here for a long term for work is the Work Permit. However, depending on the nature of the employer and work, you may be able to secure an extended business visa but I have little knowledge on that, so we’ll focus on the Work Permit here. For a Work Permit to be issued, you need to have accepted a Job Offer from an employer in Vietnam, and, usually, the employer will guide you through the process as the employer is responsible for filing the Work Permit and obtaining it for you.

If you would like to find a job in Vietnam, start by creating a profile in https://www.vietnamworks.com/en/.

When it comes to Sri Lankans, you need the following documents for a Work Permit in Vietnam, and all of them need to be certified by the Embassy of Vietnam – Sri Lanka. The documents need to be specially prepared for this certification. I will outline the documents and how they need to be prepared.

  • Police Clearance Certificate
    • This is equivalent to the Criminal Record or Judicial Record.
    • This step takes the longest to complete so I suggest starting with this one first.
    • How to get it:
      • Visit https://eservices.police.lk/ClearanceCertificate/home.action and fill in the application.
      • Choose Vietnam as the Country in the first page.
      • Choose EMBASSY OF THE SOCIALIST REPUBLIC OF VIETNAM – COLOMBO as the Reference high commission/embassy/consulate.
      • Make the payment (LKR 1,500.00 + 30.00 for postage at the time of this writing).
      • A police officer may visit at your given addresses and he/she may need a photocopy of your NIC. So, have it ready. Otherwise, you might need to go the Police station later to hand over it.
      • Wait for around 20 days for it to be delivered by registered post.
  • Degree Certificate
    • This is equivalent to the educational certificate required.
    • Go to your University’s registrar and get a copy (photocopy is adequate) of the degree certificate certified as a TRUE COPY by the registrar.
  • Proof of Work Experience
    • Usually you need at least three years of working experience for a Work Permit in Vietnam.
    • Get Service Letter/Service Certificate/Experience Confirmation from the past employers on their official letterheads clearly outlining the period of work along with a copy of the same certified as a TRUE COPY by the person who signed the original document or the head of your organisation.
    • Prepare your appointment letters, EPF certificates, and optionally, salary slips as well.
  • Medical Certificate
    • Go to a health centre and get a medical certificate issued with the certification from an M.B.B.S. doctor that you are fit to work.
    • Make sure the following are included in it.
      • Physical exam
        • Right/Left eye vision with and without glasses
        • Color vision
        • Right/Left ear hearing
        • Nose, Throat, Tonsil, Tongue, Teeth, Thyroid (each separately)
        • Pulse
        • Blood pressure
        • Heart rate
        • Vericose veins
        • Heart auscultation
        • Pulmonary system, Lung, Chest, Digestive system, Neurology system, Psychological status, Urogenital system, Musculoskeletal system (Skull, Spine, Hands, Legs), Lymphatic system
        • Chest X-ray
      • Laboratory
        • CBC: RBC, Hemoglobin, WBC, WBC differentials, ESP
        • UA (Urinanalysis): Urine density, Albumin (mg/dL), Glucose
        • VDRL (Syphilis)
        • HbsAg (Hepatitis B)
      • Day, Month, Year
      • Doctor’s signature, name, and the SEAL (very important!).
    • I did this at the Asiri Wellness Centre and it costed LKR 7,880.00 and got the certificate in like 3 days. I don’t like this to be a promotion for this place, but with the little information I had, they were the only convenient place that was very helpful and straightforward for me to get this sorted out. I consulted other famous hospitals and they were sort of clueless how to do this.
  • Passport
    • Get a photocopy of the passport with the first 4 pages fitted into one page of A4, so that when you look at the A4, you see the first 4 pages of your passport at a single glance.
  • Colour Photos
    • 5 Photos of size 4cm x 6cm, white background, front, bareheaded, without glasses, taken within 06 months prior to the application date.

Phew, now the first round of going around to prepare the documents is over. Now, take the medical certificate to the Sri Lanka Medical Council (SLMC) in Norris Canal Road to get the doctor’s seal certified as a registered doctor in Sri Lanka. No need to take the reports. Take only the certificate that has the doctor’s opinion and seal. I certified both the overall certificate and the X-ray certificate and each costed LKR 300.00. Go there early in the morning at around 9 am and it takes around two hours. You need to wait around 1 hour to get an invoice for the cost, which you will have to take to a BOC (Bank of Ceylon) branch to pay, take the receipt from the bank back to the SLMC, wait for another hour or so to get the stamped document. No vehicle parking so take the bus or taxi. The efficiency and the attitude of the staff from the security guard to everyone else is not great. When you go there, you immediately get the feeling that you are a low life peasant disturbing their natural lifestyle and you are there to help them but not the other way around. Be patient, be humble, keep your cool, focus on your business, and get out.

Once all of this is ready, it is time to get them attested by the Consular Affairs section of the Ministry of Foreign Affairs (MFA) Sri Lanka – the MOST EFFICIENT GOVERNMENT OFFICE with GREAT STAFF you will ever see. Go to http://consular.mfa.gov.lk/ONLINEBOOKING and make a booking online selecting all your 5 documents: Police Clearance Certificate, Degree Certificate, Service Certificate, Medical Certificate, and Passport. Once you make the booking you’ll get an SMS with the booking details. Choose an early morning time. They start at 7.30 am, ON TIME (Whaaat?!). Be there on time. The office is on the 2nd Floor, Ceylinco Building, Janadhipathi Mawatha, Colombo 1. Parking was available in front of the BOC tower before April 21st attacks but was restricted afterwards. They will give another number at the door as most visitors are not aware of the online system. No need to get that number since you already booked online. Just go directly to the queue near the door and say you have an online booking. Tell them the booking ID, verify the information displayed on the screen that you provided during the booking, get a token, and wait for your turn. Each attestation will cost LKR 800.00, so the total will be 800×5. Take cash. Card transactions incur a transaction fee. The attestations will be ready instantly through their e-DAS system but the degree certificate may take some time as they may do another round of verification for it. I’m not sure about other universities but with SLIIT, they will send an email to a contact person in SLIIT Academic Affairs for verification (after you have even given them a certified true copy – yeah!), and SLIIT will NOT reply to that unless you contact them and pay LKR 2,500.00. They try to call you first but sometimes, well, that never happens. MFA does not tell you if and who you need to contact at the University as well leading to this attestation getting stuck for weeks. Therefore, clarify the process with MFA as much as possible before leaving the place. For more details on the attestation process of MFA, you can refer https://www.mfa.gov.lk/consular_types/document-attestation/.

When you have all the e-DAS attestations ready, take them to the Embassy of Vietnam in Sri Lanka located in Ward Place, Colombo 7. They will certify the documents in one working day and each document certification will cost LKR 3,000.00, so the total will be 3,000×5.

Once the documents are returned by the Embassy, send soft copies of them to the employer for verification. If everything is alright, you can use DHL or UPS to send all the documents including the photos. I used DHL and it costed me LKR 6,978.11 to send from Colombo to Hanoi. They delivered it within 2 days.

After the employer receives it, they will apply for the Work Permit for you. In the meantime, get your affairs in order as the Work Permit applications seem to always be successful.

Once the Work Permit is ready, verify the details such as the name and the start and end dates mentioned in it. If your employer chooses to apply for a business visa for you, they will go to the Immigration Department and get an immigration approval letter for you. When this is ready, submit this, passport, and Vietnam Visa Application for a business visa to the Embassy and the visa will be ready in 2 working days. At the time of the writing, this visa costed LKR 15,000.00. Usually, this is a 3 month visa, which will later be followed by an employer-sponsored Temporary Residence Card.

All done. Now, it’s time to have an exciting time in Vietnam.

I sincerely hope that this helps you in your move to Vietnam wherever you are and makes everything easier than it was for me. See you soon here!
The Definitive Algorithm for Calculating Active Directory Site Link Costs

Tags

, ,

If you have worked with Active Directory for some time and you have a lot of branch sites in your organization distributed globally then one thing you probably have come across is the need to make sure that you have your Active Directory Sites and Services (ADSS) configured properly and is maintained regularly. A properly configured ADSS infrastructure provides you with a very efficient Microsoft environment within your organization. The thing with the connections to branch sites is that these connections change over time due to connection upgrades, path changes within the WAN service provider, and etc. When these changes occur the site link costs that were once configured for can be invalid and a link that was the best previously might be the worst now. Thus these costs need to be updated promptly upon these changes so that the user experience is not affected.

What we usually do is, for convenience, to configure cost values based on our “gut feeling”. For example, if we have three datacenters in Sweden, USA, and Sri Lanka, and for our branch site in Australia we would say that the site link cost for Australia-Sri Lanka is 100, Australia-Sweden is 200, and Australia-USA is 300. If you have an idea about the network then this works for the most part. This is also very easy and convenient in day to day administration but things get complicated when you have a large number of site links and many changes are occurring within the network. So you might have had this in the back of your mind now, with almost everything being automated nowadays, this is something that we can handover to a computer to do. However for a computer to do something it needs to be told how exactly to do that and for something like this to be done in a consistent way we need a – yes, an algorithm!

Designing an algorithm is the first step. Automating how to use it is a simple task when we have the algorithm. I will focus on the algorithm in this post. I haven’t had the time yet to automate this but if you get there I’d love to hear your journey!

THE Algorithm

ROUND ((1024 / LOG10 (Bandwidth)) x LOG10 (Latency))

The syntax is designed for Microsoft Excel and I will explain this so you can use and translate the logic behind it however you want in your applications.

  • Bandwidth: The minimum bandwidth of the connection (between the two sites in a site link) in kilobits per second (Kbps).
  • Latency: The average round trip time in the connection in milliseconds (ms).
  • LOG10: Common logarithm or logarithm to the base 10.
  • ROUND: The nearest whole number when rounded off.

Yeah, it’s simple as that!

In essence, this will generate low costs for high bandwidth low latency connections and generate high costs for low bandwidth high latency connections making the endpoints prefer the former over the latter for network traffic direction.

I’m writing this from Microsoft Ignite 2017, Orlando FL enjoying the beautiful climate with the sun blazing at 30 C. 🙂

Microsoft Ignite 2017, Orlando FL

What to do when things go wrong with Citrix Command Center?

Tags

, , ,

There are many things you can do to mess up the Citrix Command Center and I will keep updating this document as I come across solutions to things I mess up. 🙂

Problem: Changing the default port for the web interface to 80 or 443.
Solution: Reverting the default port to 8443 or something unique.

The moment you make this change to the port and restart the server or the Citrix Command Center service the service will no longer start. Well, if you are lucky and if there were no bindings whatsoever to port 80 and 443 it will work. Otherwise you will be stranded with no way to change the configuration since the web interface is unavailable. Here’s what you need to do when this happens so you can get things going back again.

  1. Find the wrapper.conf file in the directory “C:\Program Files (x86)\Citrix\Citrix Command Center\conf\”. This is where the port configurations for the Citrix Command Center are stored.
  2. Find the attributes,
    • wrapper.java.additional.3=-Dwebcontainer.port
    • wrapper.java.additional.4=-Dresource_check
    • wrapper.java.additional.5=-Dwebserver.port
    • wrapper.app.parameter.5 –> refers to WEBSERVER_PORT
    • wrapper.app.parameter.7 –> refers to WEBCONTAINER_PORT
    • wrapper.java.additional.21=-Dssl.port
  3. Replace the port 80 or 443 with 8443 or anything that is unique.
  4. Save the changes and restart the service “Citrix Command Center Service”.

The service will start successfully and you will be able to access the web interface as usual.

Problem: LDAP or RADIUS authentications fail and the default root account is disabled preventing logons to the Command Center.
Solution: Enable the root account.

The statuses of the user accounts in the Command Center are stored in the table “UserConfTable” in SQL database connected to it. We need to go into the table and set the root account’s status to “enabled” so that we can use it.

  1. Run the Microsoft SQL Management Studio and connect to the Citrix Command Center database.
  2. Execute the SQL command UPDATE UserConfTable SET STATUS = 'enabled' WHERE USERNAME = 'root';

Now you should be able to use the root account from the web interface.


These instructions apply to Citrix Command Center 5.2. They have not been tested with other versions.

MCSA – Windows Server 2016 – Charter Member

mcsa-server-2016-charter

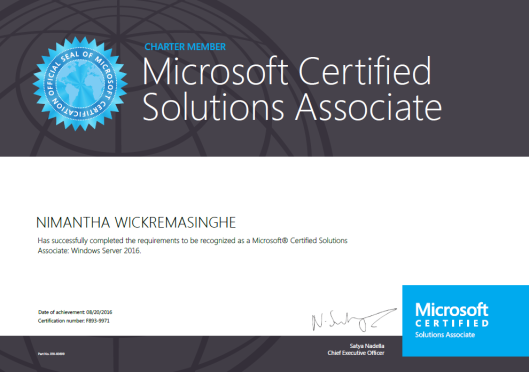
I always wanted to have the Charter status since I first started with Microsoft certifications 8 years back and after attempting my first beta exam with 70-743 to upgrade my MCSA was able to achieve it. 🙂

Microsoft’s explanation of the Charter status is as follows and it is different from what it used to be a couple of years back.
“Certification that was achieved within six months following the retail release date of the certification. Charter Members are recognized by being given the Charter version of the certificate acknowledging their early adoption of the technology solution.”

Fixing the Last Run Result 0x667 of a Scheduled Task

So today was another day with another cryptic error from the Windows Server 2008 R2 Task Scheduler. Interestingly (or as usual may be 🙂 ), the MSDN article on Task Scheduler Error and Success Constants is missing the error code. A further look into the task’s history revealed a message saying “Task Scheduler successfully completed task “\Restart Service” , instance “{ca1e5236-51d1-483f-9c39-40832f015120}” ,action “C:\Windows\System32\sc.exe” with return code 1639.” with a return code of 1639.

1639 in the MSDN article “System Error Codes (1300-1699)” referred to “ERROR_INVALID_COMMAND_LINE” which indeed it was because I was trying to use “;” as the command separator with PowerShell in mind. Replacing “;” with “&&” fixed the problem.

Note – This was a fast publish article so that the information is available to everyone without delay. Fast publish articles of mine may not be very well formatted initially.

Fixing the Last Run Result 0xFFFD0000 of a Scheduled Task

Tags

,

So I found out that one of my auditing scripts that were scheduled to run in Windows Task Scheduler was not working as expected and the “Last Run Result” of it was shown as 0xFFFD0000 which had no documentation on what it was trying to say. Luckily for me Brian at briantist.com had come across this issue before and had some pointers on what to look for. The problem was that recently we renamed the folder structure in which my script was and once the path was corrected the task started to work fine.


Sources: https://www.briantist.com/errors/scheduled-task-powershell-0xfffd0000/

Configuring a Windows Server 2012 R2 PHP Web Server

Tags

, , , , , , , ,

<?php
     $r = shell_exec ("powershell -File $tools\create-aduser.ps1 -InputFormat none > NULL");
?>

See something interesting above? That *.ps1 part. Yeah, that’s why I love PHP! PHP is advanced, full of features, capable of integrating with different systems, and open source. That’s why I “like” it but the reason for me to “love” it is it’s ability to execute PowerShell scripts. Imagine a set of complex PowerShell scripts being backed by a powerful yet simple PHP powered web portal. Then imagine people with no deep technical knowledge performing technically complex tasks from a web page in a controlled manner without any knowledge of PowerShell. How cool is that!? If you’re like me then you might be dreaming of all the new web pages that are going to make your life easier right now.

PHP can be easily configured in Unix environment. I have run PHP on Apache on a Ubuntu box and it was very easy to configure it initially. However since I’m focusing on PowerShell and administering Windows based systems Microsoft IIS Server seems to be the ideal web server but it’s a pain to configure it initially and get everything started. Once you configure everything so that you can view the output of a *.php web page with no errors you are good to go and play PHP however you want.

The difficulty in configuration exists in the correct registration of PHP in IIS. For Windows Server 2008 R2 you can use the tool PHP Manager for IIS that is designed for IIS 7 and IIS 7.5 at the time of this writing for the initial configuration. This tool is a life saver! Once you provide the path of the PHP executable to it and select “Register new PHP version” it goes ahead and takes care of all the necessary registrations. It’s 2015 and 2008 R2 is way old! We need to play with the new stuff. So when you start doing the configuration in Windows Server 2012 R2, well the PHP Manager for IIS is not supported and you have to look for a different option. I have been pulling my hair while reading the enormous number of forum posts for quite some time about the issues that we have to face when we try to configure everything ourselves. Something always falls through the cracks and it never works! But last week I think I cracked it and I know the exact recipe that it needs to work in a single streak.

…and everything starts at Build a PHP Website on IIS on TechNet! This TechNet article is a great guide with detailed steps. Therefore I’m not going to repeat the things in here. Instead I will fill in the gaps so you have everything to get this working.

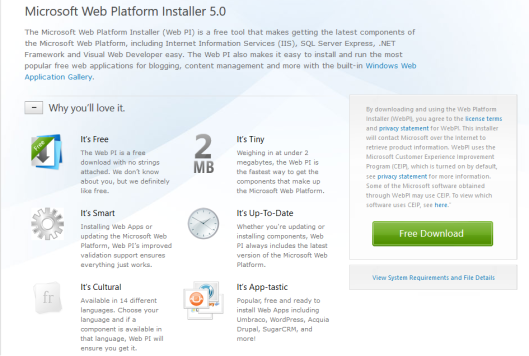
Microsoft Web Platform Installer – The new web guy in town!

Microsoft Web PI

Similar to PHP manager for IIS the Web PI will take care of the necessary PHP registrations in IIS and some of its dependencies such as WinCache extension when you install PHP through it. As I usually say, if you want to burn a few more calories, you can do it manually as instructed in the document.

THE HTTP Error 500.0 – Internal Server Error

Once the download is done and you go for the first test to see if PHP is working, if you are lucky and privileged like the most of us IT folks you’ll be presented with a BIG RED HTTP Error 500 web page! 🙂 This is where we start to pull our hair and start messing with everything including NTFS permissions.

…but the first, the very FIRST thing to check is the Visual C++ packages that are installed in the Windows server. Let’s say this in quotes to emphasize it!

For PHP to work on a Microsoft IIS Server each PHP version needs its matching Visual C++ package installed!

So there’s that! Since there are many PHP versions and many Visual C++ packages available I don’t know all the matching pairs at the moment but I’ll try to update this post with them when I come across them. The latest PHP version that is available through the Web PI, at this writing is version 5.6. The matching Visual C++ package for PHP v5.6 is Visual C++ Redistributable for Visual Studio 2012 Update 4. Once this package is installed everything should be working fine.

THE 500.0 persists even after the matching Visual C++ package is installed

If the HTTP Error 500 is still there then it needs further troubleshooting. You can start by checking the IIS server-level FastCGI settings and the Handler Mappings, and continue troubleshooting along the steps mentioned in the HTTP Error 500.0 web page.

IIS server-level FastCGI settings and Handler Mappings configuration of a working PHP host

FastCGI Settings

  • Full path : Path to php-cgi.exe (e.g. C:\Program Files(x86)\PHP\v5.6\php-cgi.exe)
  • Arguments : default
  • Max. Instances : default
  • Instance Max. Requests : default

Handler Mappings

  • Path : *.php
  • State : Enabled
  • Path Type : File or Folder
  • Handler : FastCgiModule
  • Entry Type : Local

Let’s make those wonderful PowerShell powered web sites!


Update: 2016-02-17

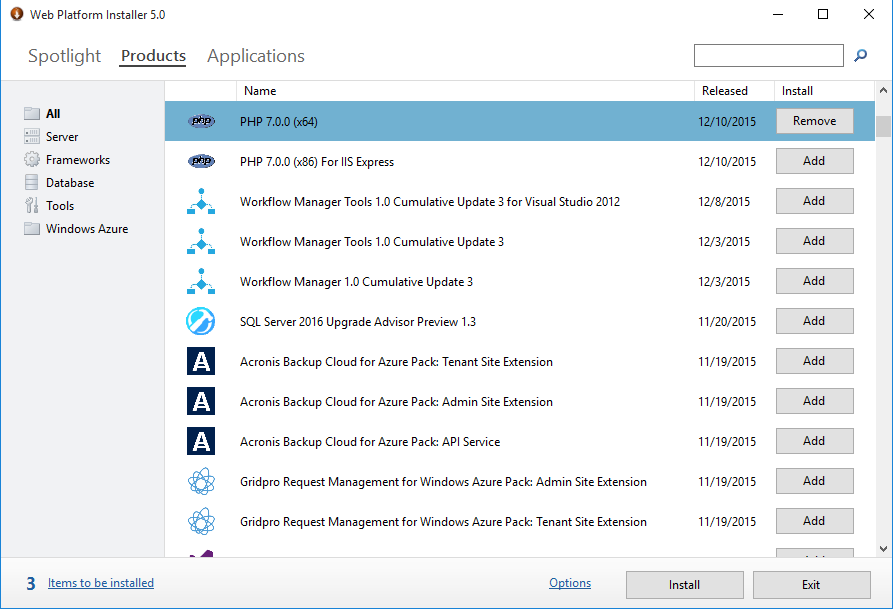
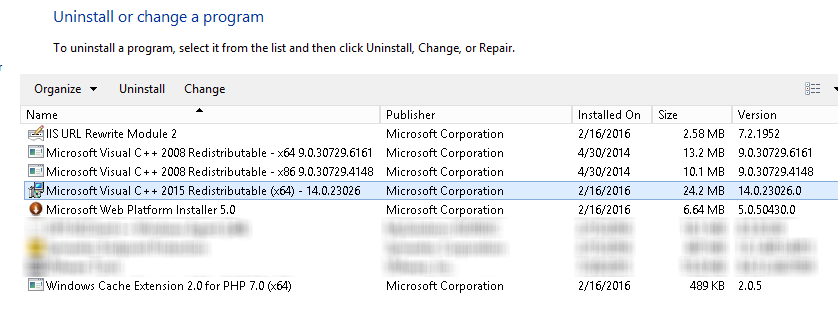
The new PHP 7.0.0 package in the Web Platform Installer 5.0 seems to resolve these dependencies automatically. Yesterday I installed PHP 7.0.0 (x64) on a Windows Server 2012 R2 machine from Web PI and I was surprised to see PHP working right away after the installation. When I checked the Programs and Features I could see the matching Visual C++ packages installed automatically.

webpi-php7

PHP package in Web PI 5.0

visualcpp-for-php7

Automatically installed Microsoft Visual C++ package


Sources:

Enabling WinRM on Domain Controllers

Tags

, , , , ,

WinRM is a really cool feature when scripting tasks and managing Windows servers remotely. I’ve been struggling to enable it on the domain controllers in our globally-distributed environment, following almost every guide I could find online but haven’t had any success until yesterday. So I thought about having it documented here in case someone else comes across similar problems in future.

Configuring the listeners

I’m going to use Kerberos authentication for WinRM so the configuration is quite simple. If you are planning to use a different type of authentication such as basic authentication or CredSSP then you’ll need a few additional steps which I won’t be discussing here.

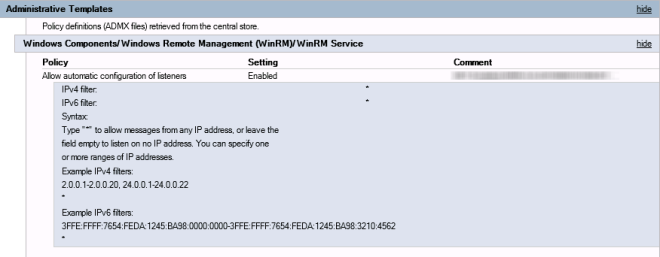
The first step is to configure the WinRM listeners for IPv4 and IPv6. I’m going to allow the WinRM listeners to listen on all IP addresses of the domain controllers in this case. If you want to restrict it to listen only on certain IP addresses follow the instructions given with the settings. So I’m configuring the GPO setting Computer Configuration / Policies / Administrative Templates / Windows Components Windows Remote Management (WinRM) / WinRM Service to listen on all IP addresses as follows.

winrm-listeners

Configuring the Windows service

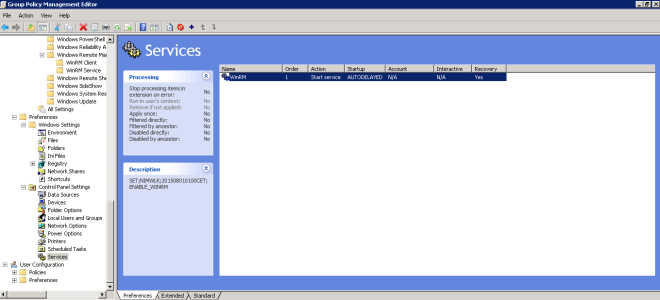
Now since we have the listeners configured we need the WinRM service get going for the configurations to take effect. Let’s make sure that this service is configured to run automatically using group policy. Of course you can do this manually on all the domain controllers if you feel like burning a few more calories. 😉

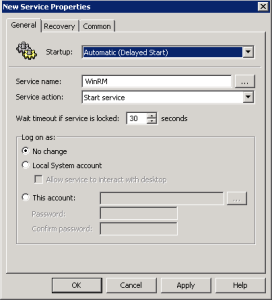
I’m adding a new service in the GPO setting Computer Configuration / Preferences / Control Panel Settings / Services for WinRM and setting the “Startup” to “Automatic (Delayed Start)” and “Service action” to “Start service”.

winrm-svc winrm-svc-1

Once the service is running you should be good to go. However if you have the firewall turned on then you need to make sure the necessary ports are allowed through it. I won’t cover the firewall configuration in here.

Exceptional Cases

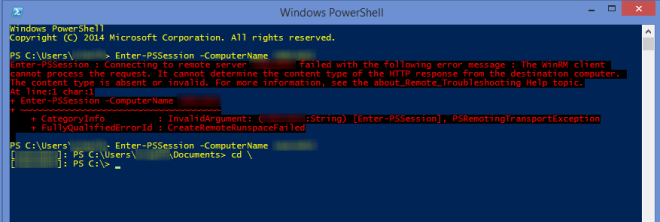
“The WinRM client cannot process the request. It cannot determine the content type of the HTTP response from the destination computer. The content type is absent or invalid.”

winrm-ps-http-error

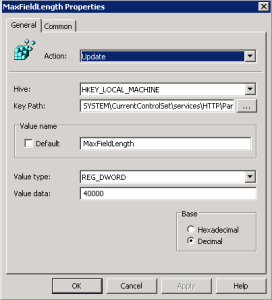
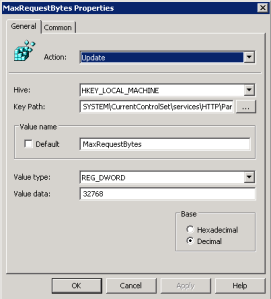
I’m not completely sure of the exact reasons for this error but I’ll explain my experience with it. Our domain is one of those where the user accounts are member of a large number of Active Directory security groups. With systems that use Windows authentication (or Kerberos authentication) with HTTP we usually come across problems with authentication due to the large size of the Kerberos tokens. This error tries to explain this problem (in its own way I guess :-P). The solution however is to configure the HTTP service to process larger HTTP headers. We can do this by configuring the two registry keys MaxRequestBytes and MaxFieldLength for HTTP service parameters. Let’s do this via group policy as well so we have everything at a single place and applied consistently across all the domain controllers.

We will configure the registry settings under Computer Configurations / Preferences / Windows Settings / Registry as follows.

winrm-reg

winrm-reg-mflwinrm-reg-mrb

The following image shows the error given when trying to connect to a domain controller through WinRM before performing this configuration and the successful connection after applying the new settings.

winrm-ps-before-n-after


Sources: